Home décor doesn’t have to cost a fortune or demand the skills of a professional interior designer. With a little creativity and some basic materials, you can transform your living space in ways that are both stylish and kind to your wallet. Here are fifteen budget-friendly DIY home décor projects that blend beauty, practicality, and personal flair, ensuring your home truly reflects who you are.
1. Painted Accent Wall
A single wall painted in a bold color can instantly refresh any room without the cost of a full repaint. Whether you choose a deep emerald, a bright coral, or a moody navy, an accent wall creates a focal point that draws the eye and changes the room’s energy.
Consider geometric shapes, color blocks, or simple stripes to add extra interest. For instance, a two-tone wall with a contrasting color on the lower half can mimic the look of expensive wainscoting. Using painter’s tape makes clean lines easy for even novice DIYers.
Paint brands like Behr or Sherwin-Williams offer high-quality paint in smaller quantities, perfect for accent walls. You’ll find inspiration and tutorials on sites like HGTV that explain how to achieve different looks and choose colors that complement your décor.
2. Floating Shelves from Reclaimed Wood
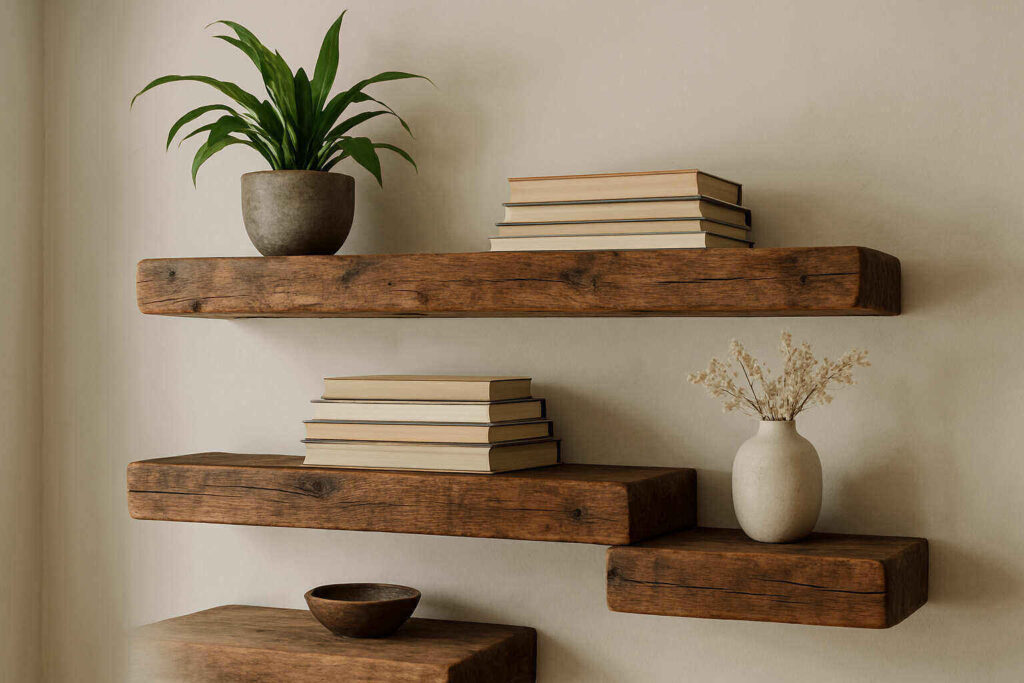
Floating shelves are a stylish and practical way to add storage and display space without overwhelming your walls. Crafting them from reclaimed wood not only saves money but also brings unique character and sustainability to your décor.
Start by sourcing old wooden boards from places like salvage yards, thrift shops, construction sites, or even leftover materials in your garage. Choose boards with interesting grain or weathered textures for extra visual appeal. Sand the wood smooth, and stain or seal it to match your interior style.
Mounting is crucial for creating a clean, floating look. Heavy-duty brackets hidden inside the shelf or specialized floating shelf hardware ensure your shelves stay sturdy and safe.
One of the biggest benefits of DIY floating shelves is customization—you can tailor the length, depth, and finish to perfectly suit your space and storage needs, whether in the kitchen, living room, or bathroom.
For clear, professional instructions, check out guides like This Old House’s tutorial on building and installing floating shelves. With a bit of time and effort, you’ll gain attractive storage that looks custom-made at a fraction of retail cost.
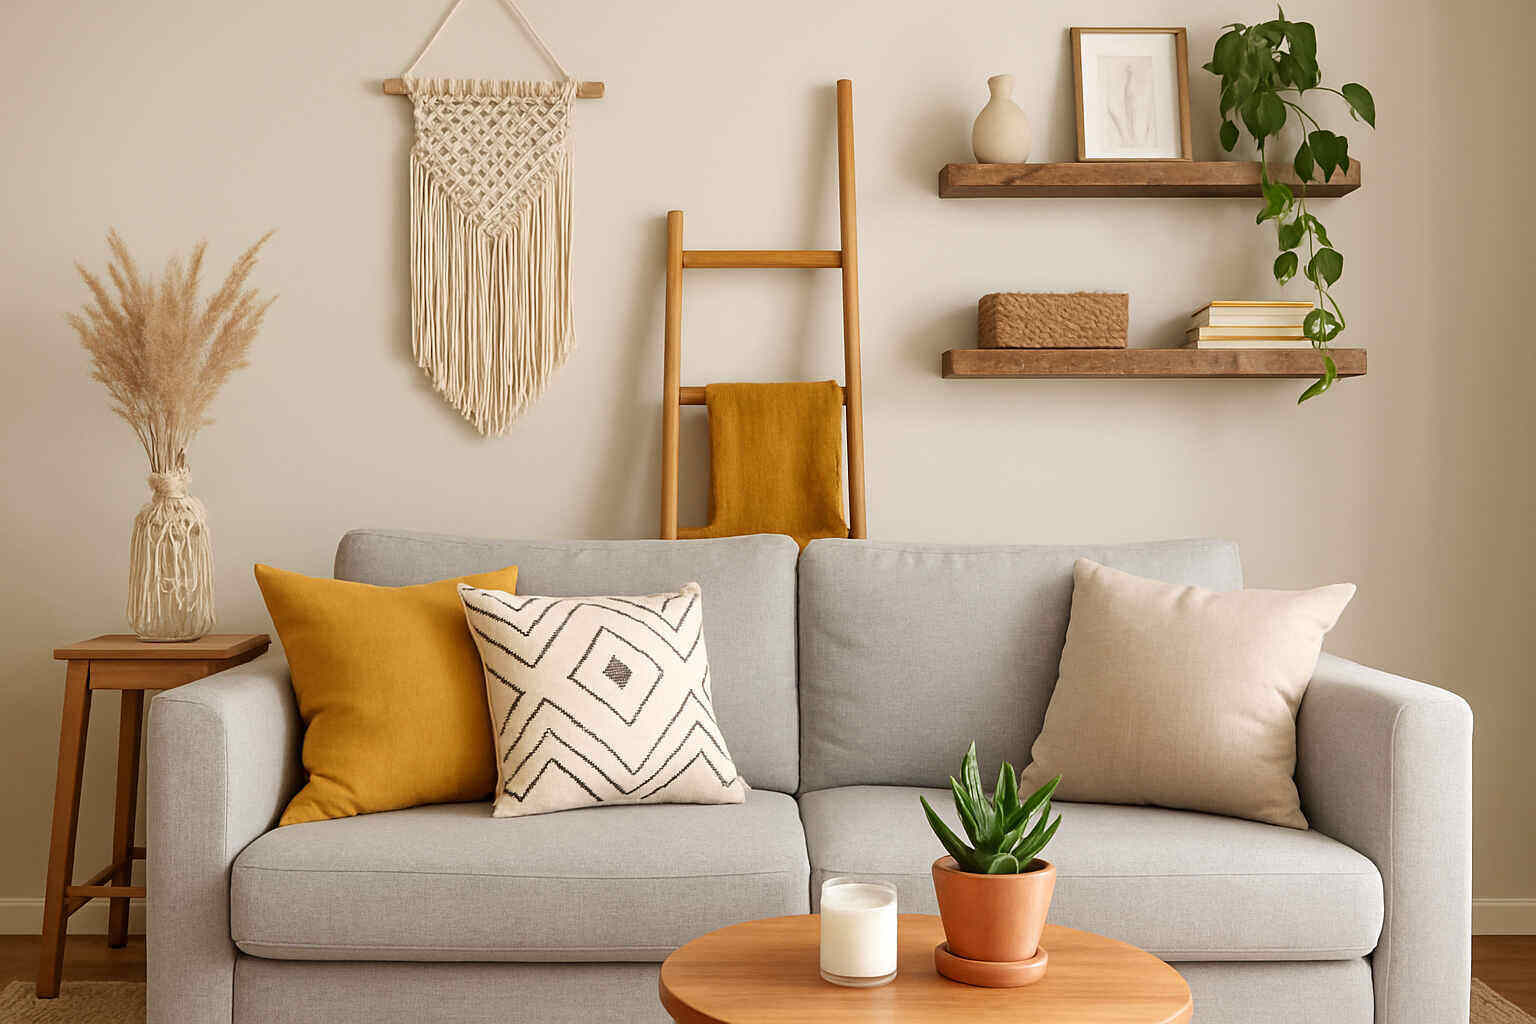
3. DIY Macramé Wall Hangings
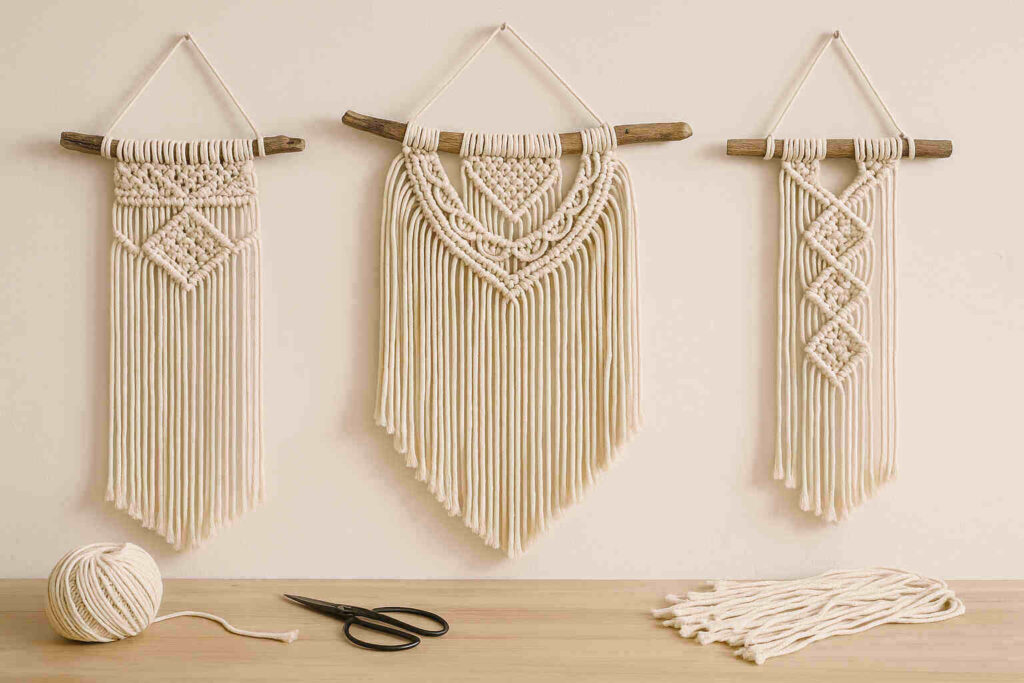
Macramé, the timeless craft of knotting cords into decorative patterns, has surged back into popularity, offering an affordable way to bring artistic flair into your home. Crafting your own macramé wall hanging can cost less than $20 and instantly adds a stylish, bohemian touch with its intricate texture and natural materials.
To get started, gather cotton cord and a sturdy dowel rod or a rustic tree branch as your hanging base. Learn basic knots such as the square knot or the lark’s head knot, which serve as the building blocks for numerous beautiful patterns. Even beginners can create elegant pieces, while more detailed patterns become eye-catching art installations.
Beyond being cost-effective, DIY macramé lets you customize the size, color, and style to perfectly match your space and personality. Plus, the rhythmic knotting process can be surprisingly relaxing and meditative.
For clear, step-by-step guidance, explore the many free tutorials available on sites like Craftsy, which make it easy to master new techniques. Ultimately, crafting your own macramé wall hanging ensures your home décor is unique, personal, and filled with handmade charm.
4. Stenciled Floor Tiles

Breathe new life into tired floors without the high costs of replacing them by using tile stencils and paint. This clever DIY approach creates the look of trendy encaustic cement tiles, delivering beautiful patterns and unique style to kitchens, bathrooms, or hallways at a fraction of the price.
Begin by scrubbing the floor thoroughly to remove dirt and grease, then apply a sturdy primer to help the paint adhere. Choose durable floor paints and quality stencils that suit your décor—geometric motifs, florals, or vintage-inspired designs all work wonderfully. Carefully tape your stencil in place, roll on paint in thin layers, and allow each coat to dry.
Once finished, seal the floor with a protective clear topcoat to ensure your design stands up to daily wear and moisture. Compared to installing new tile, this method can save you hundreds of dollars while offering flexibility if you decide to update the look later.
Explore real-life transformations and expert tips on Apartment Therapy, where DIYers share inspiring examples of painted floors that remain stylish and durable over time.
5. Gallery Wall of Thrifted Frames
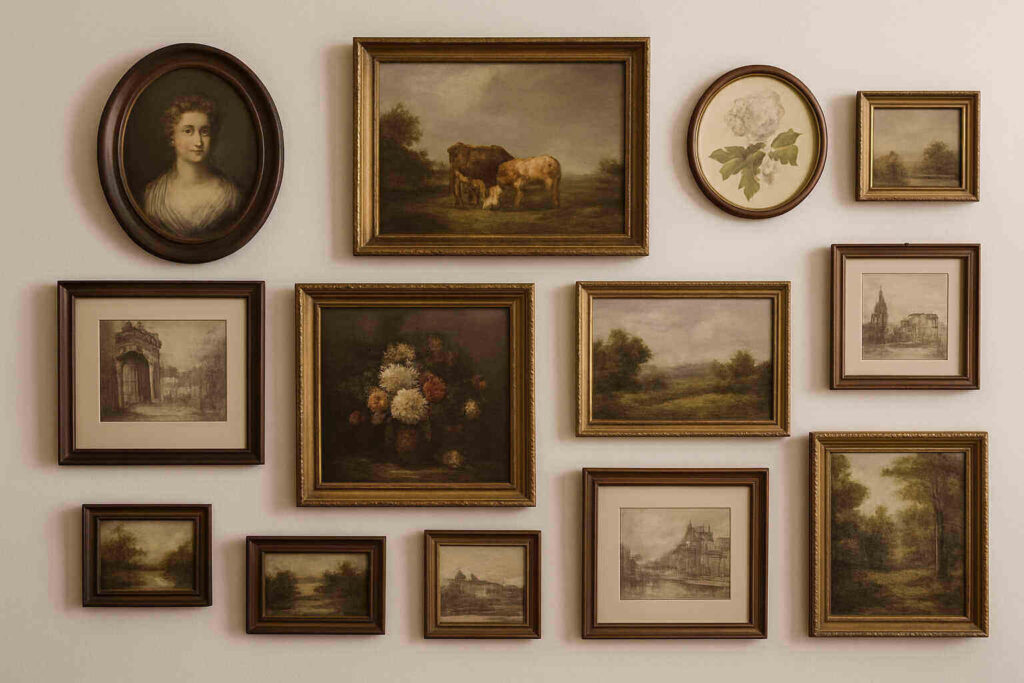
Creating a gallery wall is an inexpensive way to bring color and character to any empty wall. Instead of investing in pricey art pieces, explore thrift stores, flea markets, or dollar stores for affordable frames in various shapes and sizes. Even if the frames don’t match initially, you can easily unify them with a coat of spray paint in a single color like black, white, or gold, giving your collection a harmonious, curated look.
Fill your frames with personal photos, printable artwork, vintage postcards, children’s drawings, or even pages from magazines that reflect your taste and personality. Before hanging, lay out your frames on the floor to experiment with different arrangements and spacing until you find a composition that feels balanced and visually engaging. Combining vertical and horizontal frames brings dynamism and conveys a feeling of movement in the display.
For helpful guides on layouts, measuring, and hanging techniques, resources like The Spruce provide excellent step-by-step instructions. With creativity and minimal expense, a gallery wall transforms empty walls into an eye-catching focal point that tells your unique story
6. Mason Jar Pendant Lights
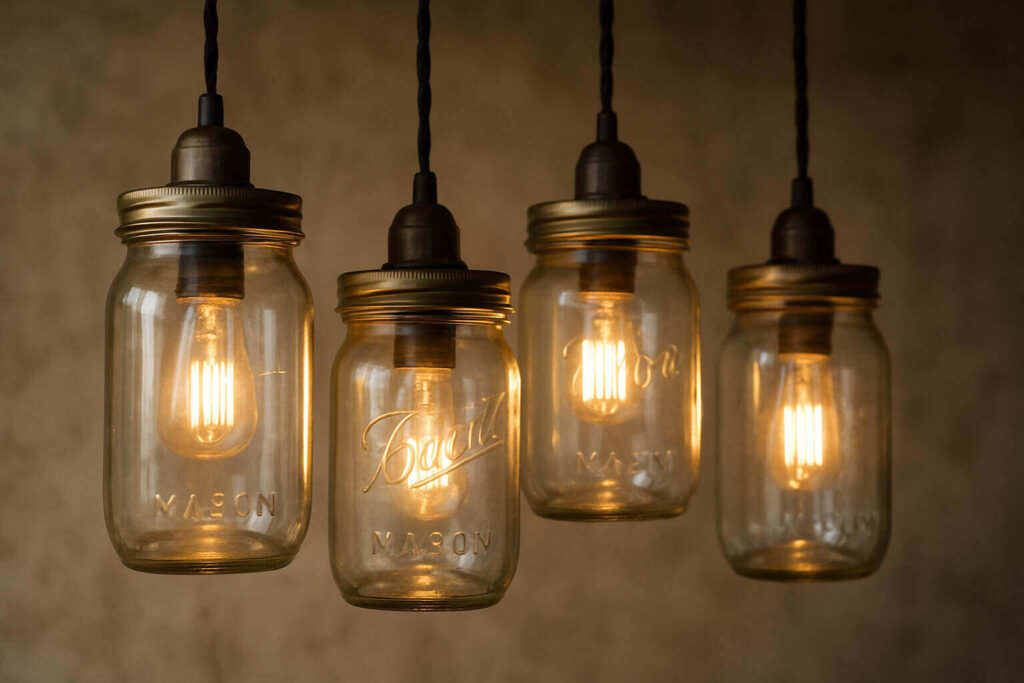
Transform ordinary mason jars into stylish pendant lights that bring personality and warmth to any space, from cozy kitchens to rustic-inspired living rooms. This DIY project is budget-friendly and surprisingly simple, making it ideal for anyone looking to upgrade their lighting without splurging on expensive fixtures.
Start by choosing mason jars that suit your décor—clear glass for a clean, modern look or tinted jars for added color and charm. You’ll need to drill a hole in the metal lid large enough to fit a light socket snugly. Many affordable conversion kits are available online, some starting as low as $10, and include the necessary hardware and wiring.
Pair your new pendant lights with Edison-style bulbs for a vintage glow, perfect for creating a welcoming atmosphere. Hanging several jars in a row above a kitchen island or dining table can mimic the effect of designer lighting at a fraction of the cost.
Not only is this project cost-effective, but it also offers endless opportunities for customization, from painting the jars to choosing different cord styles. For clear, step-by-step guidance, visit Bob Vila’s tutorial to ensure your lighting makeover is both safe and stylish.
. 7. Fabric-Covered Headboards
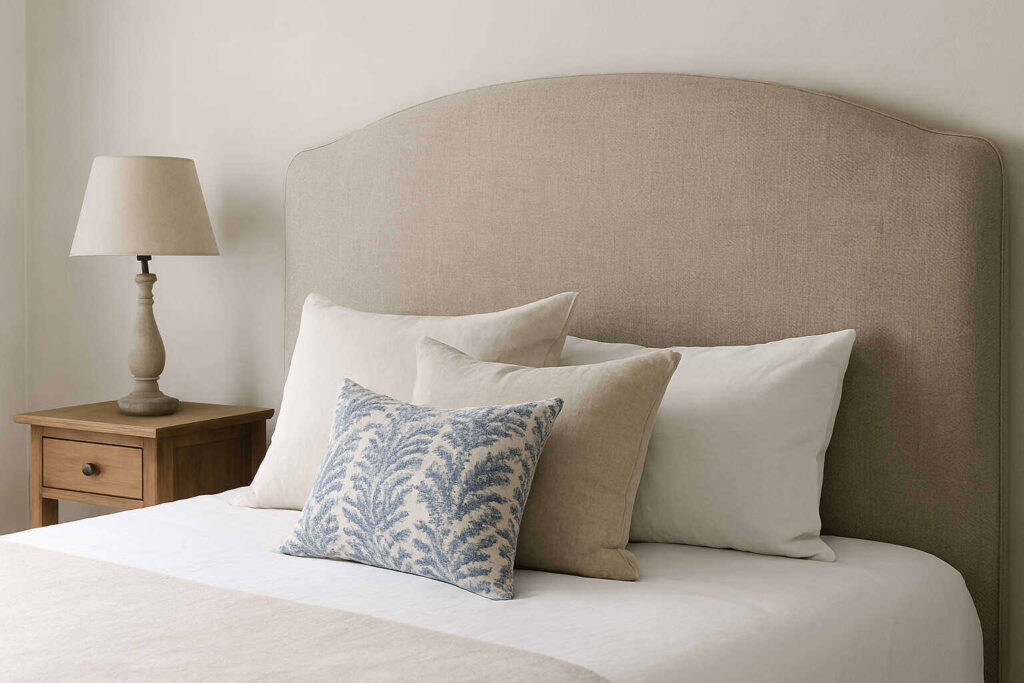
Transform your bedroom’s look with a DIY fabric-covered headboard—a stylish upgrade that’s surprisingly budget-friendly. While store-bought upholstered headboards can cost hundreds of dollars, making one yourself requires just a few materials and basic tools. Start with a sheet of plywood cut to fit the width of your bed. Wrap the piece in foam for cushioning, then add a layer of batting on top to create a smooth surface. Finally, wrap the chosen fabric around the board and fasten it securely at the back using staples..
Select fabrics that express your personal style, such as velvet for a rich, elegant feel or linen for a light and modern appearance.. For added elegance, consider creating a tufted design by pulling buttons through the fabric and securing them at the back. Even without tufting, a simple rectangular headboard makes a dramatic statement and coordinates beautifully with your bedding and décor.
This project offers creative freedom and significant savings compared to buying ready-made designs. For step-by-step tutorials and inspiring styles, explore guides on Better Homes & Gardens. With a bit of time and creativity, you can design a headboard that truly transforms your bedroom into your personal sanctuary
8. Peel-and-Stick Backsplash
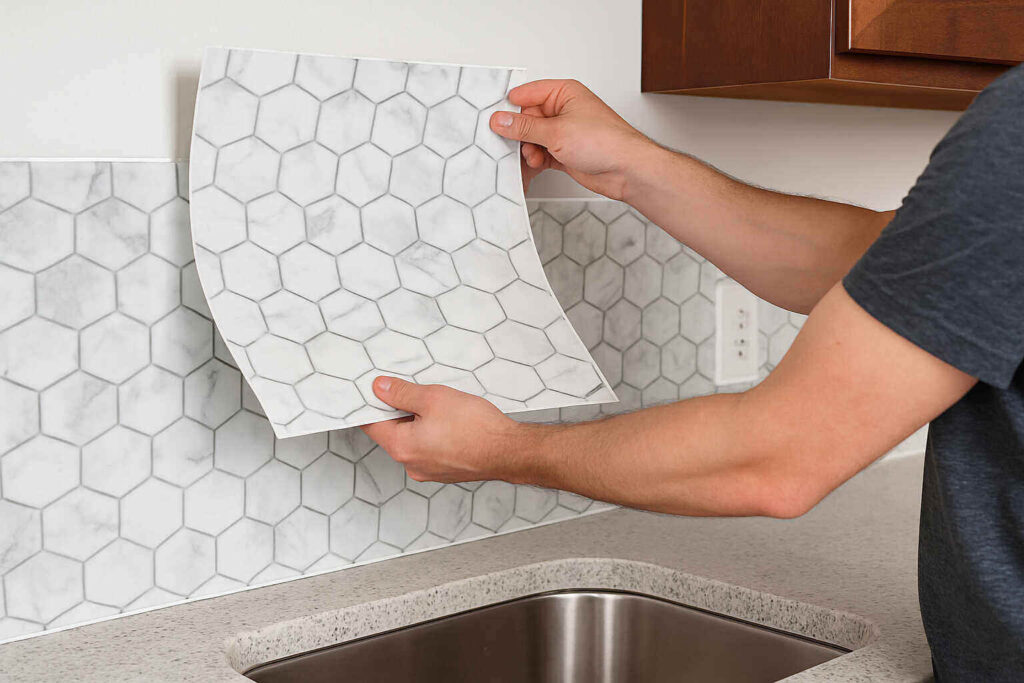
Updating a kitchen or bathroom backsplash can dramatically change the look of a room, but traditional tile installation often comes with hefty costs and a mess of grout and tools. Peel-and-stick backsplash tiles offer a clever, affordable solution for a stylish refresh without the high price tag.
These innovative tiles come in a variety of designs, including patterns that convincingly mimic ceramic, glass, stone, or metal. Installation is simple: clean your wall thoroughly, measure and trim the sheets to size, then press them firmly into place. They’re water-resistant and durable, making them ideal for areas prone to splashes and steam.
A significant bonus is how easily peel-and-stick tiles can be removed or replaced if you decide to change your décor later—a flexibility that traditional tiles don’t offer. Compared to professional tile work, peel-and-stick options save time, money, and effort, while still delivering a polished look.
For guidance and inspiration, The Home Depot provides step-by-step tutorials to help achieve flawless results even for DIY beginners.
9. Homemade Scented Candles
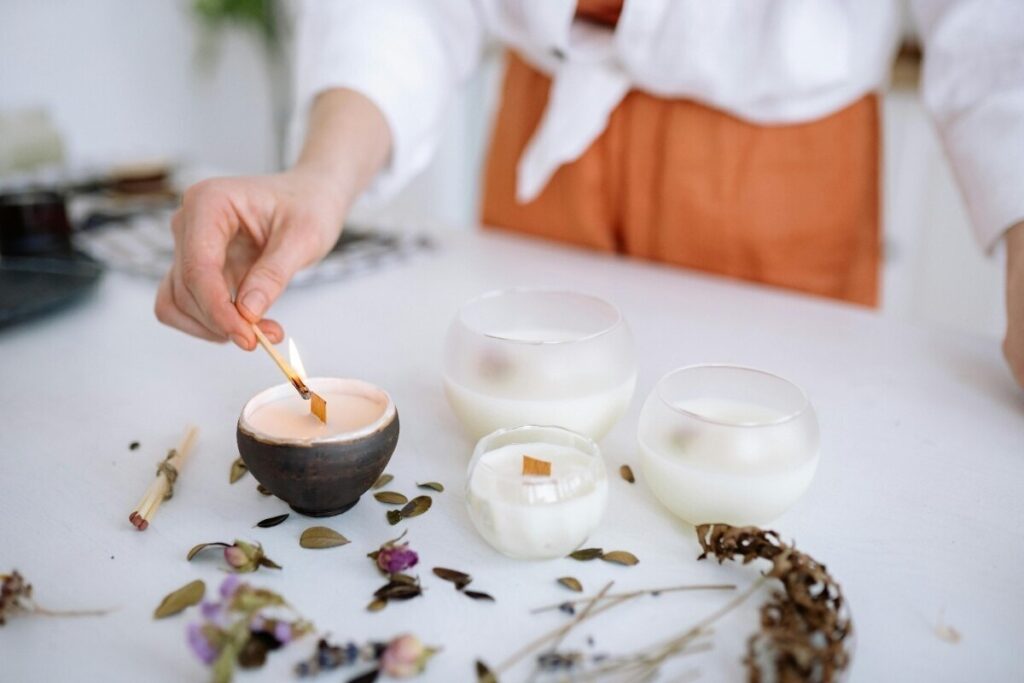
Creating your own scented candles is a satisfying way to bring warmth and personalized fragrance into your home while saving money compared to expensive store-bought brands. All you need are simple materials like soy wax, essential oils, and containers such as recycled glass jars, teacups, or even vintage tins for a touch of character.
Experiment with scents to suit different moods or seasons—for example, refreshing citrus for summer, cozy cinnamon and clove for autumn, or calming lavender for spring. Beyond enhancing your own living space, homemade candles make thoughtful, customizable gifts for friends and family.
The process is straightforward: melt the wax, mix in your chosen fragrance, and pour it into containers fitted with wicks. However, it’s crucial to follow safety guidelines to prevent issues like uneven burning or cracking.
For detailed instructions and tips to ensure your candles burn safely and smell delightful, resources like Good Housekeeping offer reliable tutorials. With a bit of creativity and care, homemade candles can elevate your home’s atmosphere and add a personal touch to your décor.
10. Painted Plant Pots
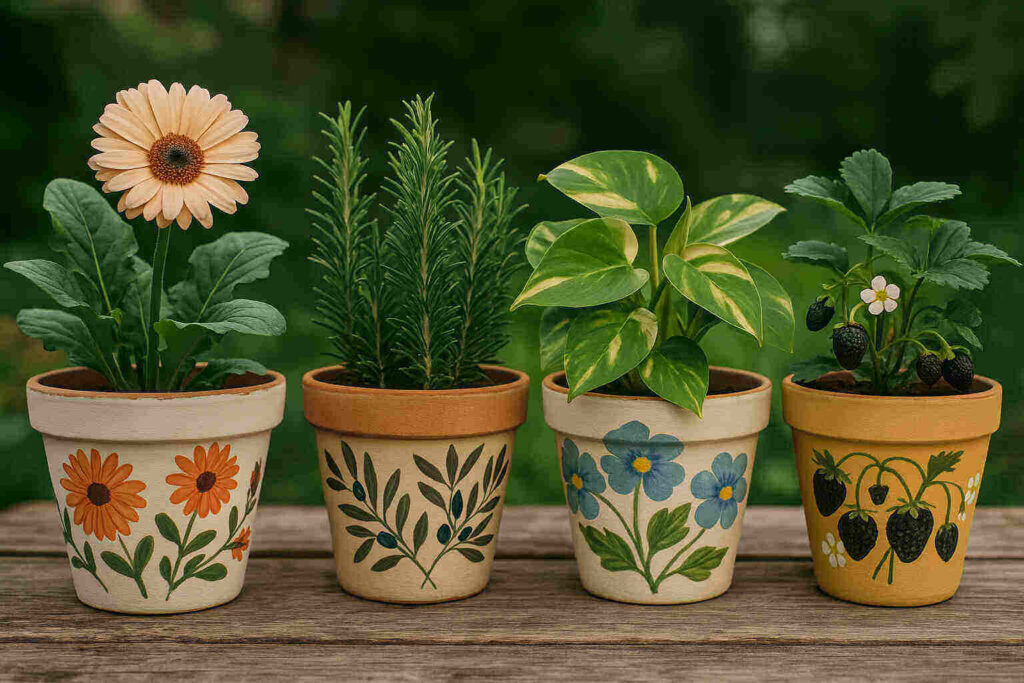
Plain terracotta pots can look dull, but with a bit of creativity, you can easily transform them into vibrant, eye-catching pieces. Using acrylic paint, try bold geometric designs, playful polka dots, or stylish ombré fades that blend from one color to another. Make sure to clean the pots thoroughly before painting so the paint adheres properly. Once dry, apply a clear sealant to protect your artwork from water and soil moisture, helping your designs last longer without chipping or peeling.
Decorating plant pots not only adds a personal touch to your indoor garden but also ties your plant displays into the color scheme of your home décor. It’s an inexpensive way to give your living space a new look without purchasing new accessories.
This is also a fantastic project to enjoy with kids, giving them a chance to explore colors and patterns while creating something useful. Whether you choose elegant, minimalist designs or bright, playful colors, painted pots bring personality and charm to any room.
For inspiration and step-by-step tutorials, check out Martha Stewart’s guide on decorative flower pots.
11. Reupholstered Dining Chairs
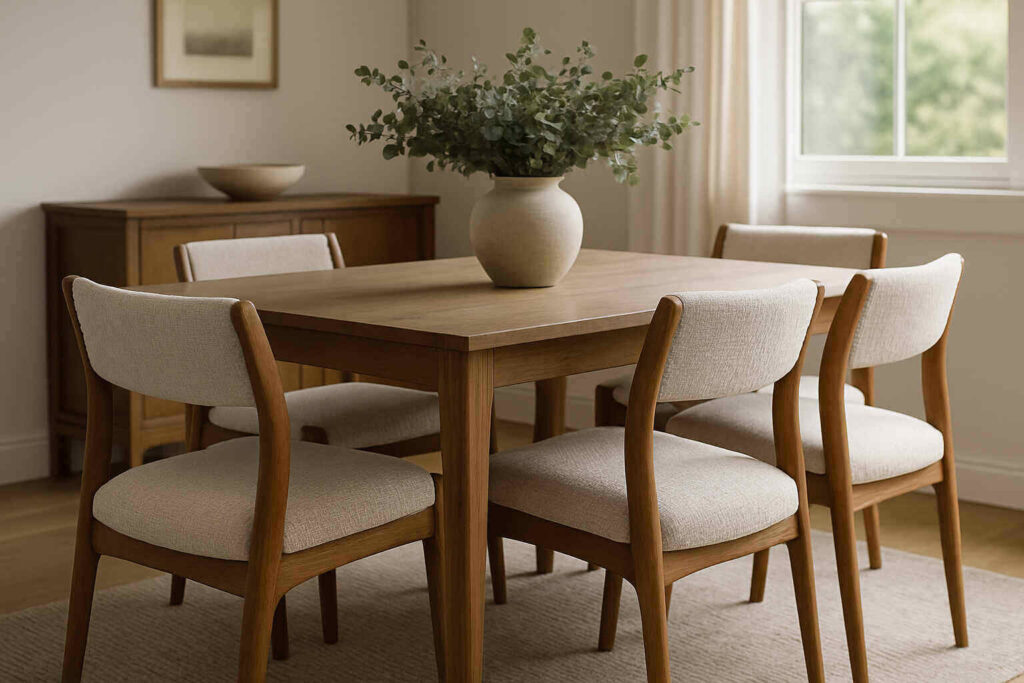
Breathing new life into your dining space doesn’t have to mean splurging on brand-new furniture. Reupholstering your dining chairs is a cost-effective, satisfying DIY project that can dramatically change a room’s look. Begin by flipping the chair over and unscrewing the seat cushion from the frame. Lay the cushion on your chosen fabric, ensuring any patterns align the way you’d like. Cut the fabric generously to wrap around all sides. Stretch it snugly over the cushion, folding the corners neatly for a smooth finish. Secure the fabric underneath with a staple gun, working from the center outwards to avoid wrinkles.
Bold prints, vibrant colors, or rich textures can make your dining area stand out and reflect your personal style. Alternatively, neutral fabrics offer a timeless appeal that pairs well with different décor themes. Compared to buying new chairs, this project saves significant money and reduces waste, making it a sustainable choice. Plus, it’s beginner-friendly, requiring only basic tools and a free afternoon.
For inspiration and step-by-step visuals, websites like Family Handyman provide helpful guides, ensuring your DIY upgrade looks polished and professional.
12. DIY Cork Bulletin Board

A DIY cork bulletin board is a stylish and useful way to organize notes, photos, and reminders while adding a creative touch to your décor. Instead of a plain store-bought board, craft your own by recycling wine corks. Start collecting corks from your own gatherings or purchase them inexpensively in bulk online.
Choose a sturdy frame in the size you prefer, then arrange your corks inside in eye-catching patterns like herringbone, chevron, or a simple brick layout. For extra personality, paint some corks in coordinating colors or leave them natural for a rustic vibe. Use strong craft glue or a hot glue gun to secure each cork firmly.
This project not only helps reduce waste but also creates a unique focal point for your office, kitchen, or entryway. For fresh ideas on patterns and styles, check out HGTV’s creative corkboard projects to tailor your bulletin board perfectly to your space and taste.
13. DIY Fabric Roman Shades
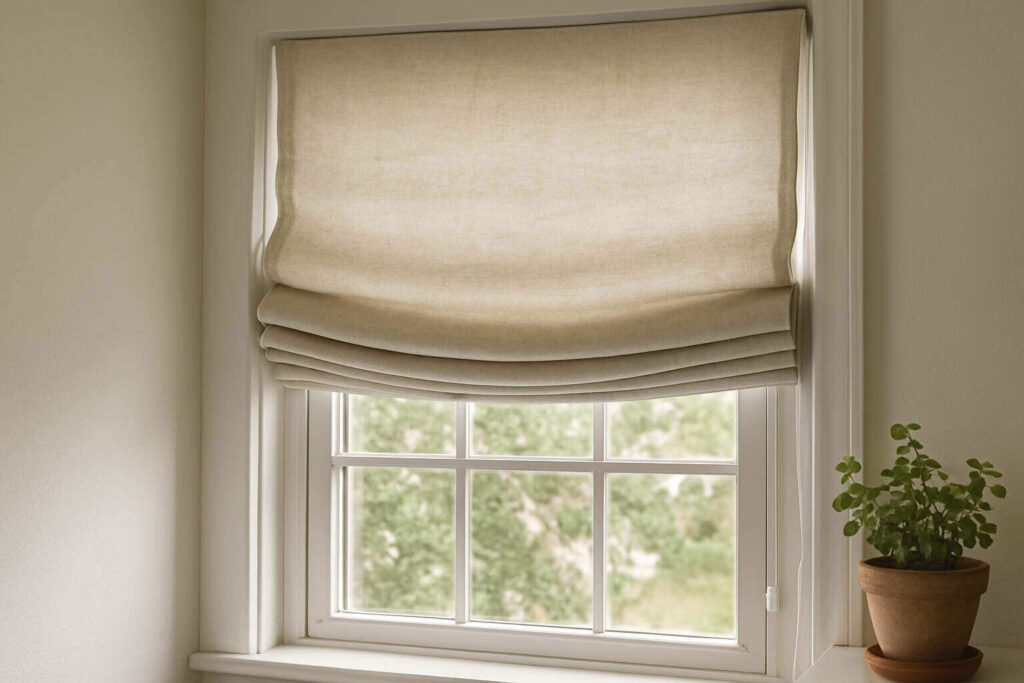
Roman shades bring an elegant, tailored look to any room, but custom-made options often come with hefty price tags. Fortunately, you can create your own beautiful shades without spending a fortune. All you need is affordable fabric, a few tension rods, and either a sewing machine or strong fabric glue for a no-sew approach.
Choose fabrics in patterns or colors that complement your décor—bold florals can make a vibrant statement, while subtle stripes or solids offer a more classic appeal. Roman shades are perfect for softening a space and providing privacy, without the bulk of traditional drapes. They’re especially ideal for small rooms where you want to maximize natural light while still maintaining coverage.
Measure your windows carefully and cut the fabric slightly wider to allow for neat edges. If sewing isn’t your thing, fabric glue can securely hold hems and folds in place. This DIY project can completely transform your windows, giving them a polished, custom feel at a fraction of retail costs.
For step-by-step instructions and creative inspiration, explore this helpful no-sew Roman shade guide from The Spruce.
14. Decorative Ladder Rack
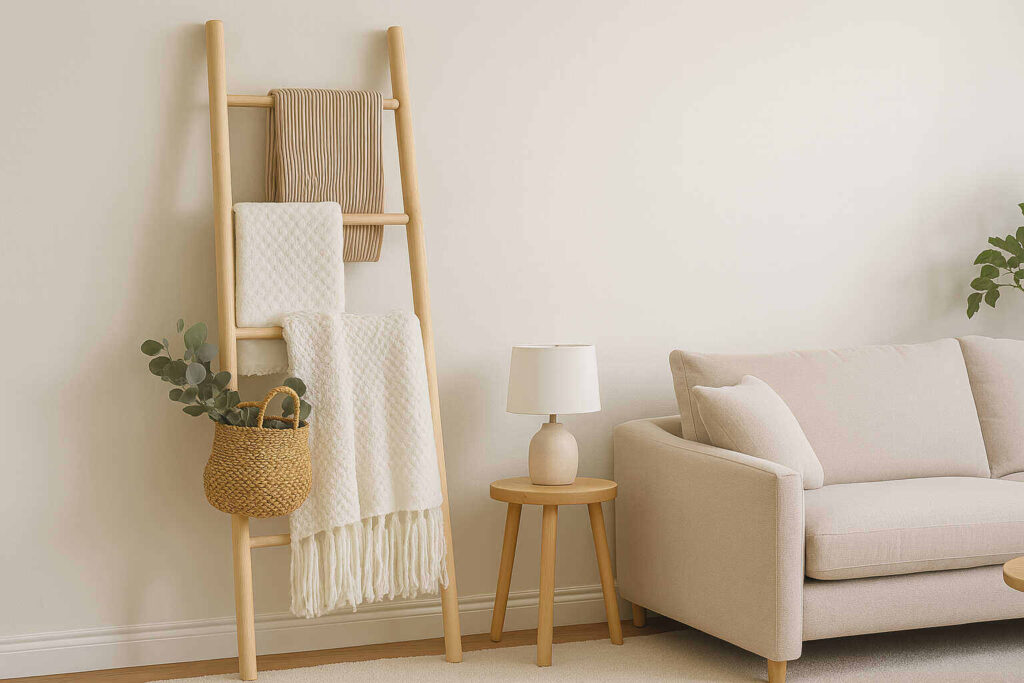
A decorative ladder rack is a brilliant way to blend charm and function into any living space. Simply lean a wooden ladder against the wall to create vertical storage that looks as good as it works. In a bathroom, drape towels for an instantly spa-like vibe; in the living room, it’s perfect for displaying cozy throw blankets; in the bedroom, hang scarves, hats, or jewelry to keep accessories organized and accessible.
For a personal touch, craft your own ladder using pine or reclaimed wood. Cut and sand the boards, assemble with wood screws, and finish with stain or paint to match your décor style—natural wood suits rustic spaces, while crisp white or bold colors work beautifully in modern homes. Alternatively, breathe new life into an old wooden ladder from a thrift store or flea market with a quick sanding and fresh coat of paint.
This stylish piece saves floor space compared to bulky shelves and adds height and visual interest to your room. For step-by-step instructions and safety tips on building your own ladder rack, check out DIY Network’s guide.
15. Framed Wallpaper Art
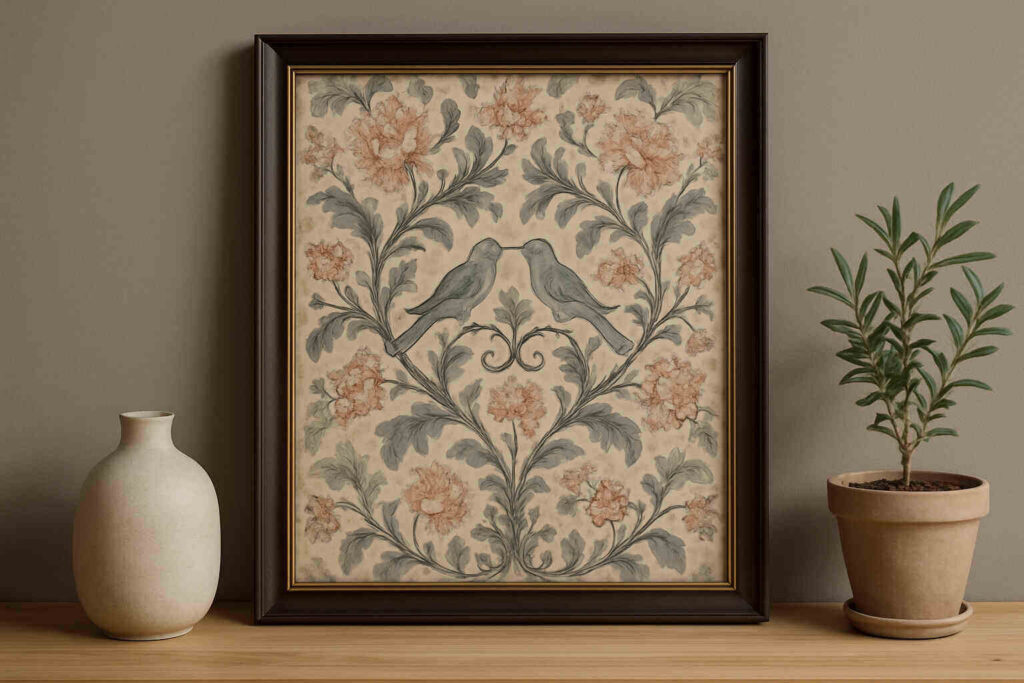
Love bold wallpaper but can’t commit to covering an entire room? Frame panels of your favorite wallpaper patterns as large-scale art.
This method adds color and pattern without the cost or permanence of wallpapering a full wall. It’s perfect for renters or anyone who likes to change styles frequently.
Sites like Real Simple explain how to choose frames and hang panels for maximum impact.
With a few simple materials and some creativity, you can refresh your home décor without straining your budget. These DIY projects prove that style and savings can go hand in hand, leaving your space uniquely yours.